


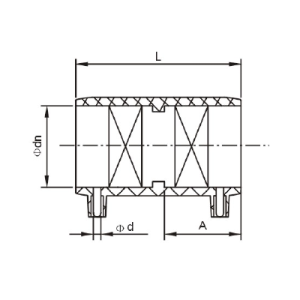
FUIS Electrofusion - Equal Socket
PE100 - PN10 / 16
Product Group : Fuis Electrofusion Fitting
Application : Potable water distribution, Irrigation, Gas, Mining
Electrofusion coupler are used to joint two separate HDPE Pipe in a parallel manner. The jointing using Electrofusion are homogenous, i.e. the fitting and pipe are welded together thus preventing any leakage.
Standard and Certification
- O-rings: EPDM
- Body: Welded steel S235JR (St.37-2)
- Valve sealing: EPDM
- Disk: Welded steel S235JR (St.37-2)
- Butterfly valve stem: Stainless steel 1.4021
- Shaft bearing: Zincfree bronze
- Seat: Stainless steel, microfinished
Questions about the product?
Our experts will gladly answer your questions and support you competently and reliably!
Resilient-seated gate valve with bolted cover connection and socket connection on both sides for boltless connection to the VAG BAIO®plus System.
- O-rings: EPDM
- Body: Welded steel S235JR (St.37-2)
- Valve sealing: EPDM
- Disk: Welded steel S235JR (St.37-2)
- Butterfly valve stem: Stainless steel 1.4021
- Shaft bearing: Zincfree bronze
- Seat: Stainless steel, microfinished

Electrofusion is a quick and easy method to connect polyethylene (PE) pipes. Prefabricated fittings are used, incorporating an electrical heating coil which melts the plastic of both the fittings and the pipe, causing them to fuse together. Below are the proper process for an electrofusion fitting jointing.

Step 1
Cut the pipe precisely and make sure the cut is squared and parallel. Wipe off the debris using damp cloth. Mark insertion depth on the pipe.

Step 2
Using pipe scrapper, scrape one of the pipe end for the length of insertion plus an additional 10-20mm.

Step 3
Take out the fitting, ensure the inner wall of the fitting is free from debris. Position the fitting into the pipe and make sure the fitting fit to center spot.

Step 4
Visually check the pipe alignment in all plane and secure the pipe with restraining clamp. Ensure there are no movement during fusion process. Proceed to repeat the steps for the second pipe end.

Step 5
Link the fitting terminal to the control box output leads. Scan the barcode for the fitting using barcode scanner from the terminal box. Start the fusion process once all parameters are set. Make sure the weld cool completely as specified before removing the assembly.
 I am text block. Click edit button to change this text. Lorem ipsum dolor sit amet, consectetur adipiscing elit. Ut elit tellus, luctus nec ullamcorper mattis, pulvinar dapibus leo.